Introduction
There are several benefits to running Leap on your laptop using Docker Desktop and Kubernetes. It offers an excellent learning opportunity if you’re new to Kubernetes. Additionally, it provides the flexibility to explore the administrative aspects of the product, especially if you’re unable to do so with your current on-premise deployment.
Prerequisites
Docker Desktop
You will need Docker Desktop for either Windows or Mac. This tutorial was developed using Mac. Docker Desktop comes with Kubernetes as an option that can be enabled.
Leap 9.3.7 (or greater) Image and Helm Chart
This can be downloaded from the HCL software portal. You will download a zip file which contains a Docker image and a Helm chart. You can also access the Leap image and helm chart from the Harbor repository.
Step 1 – Enable Kubernetes in Docker Desktop
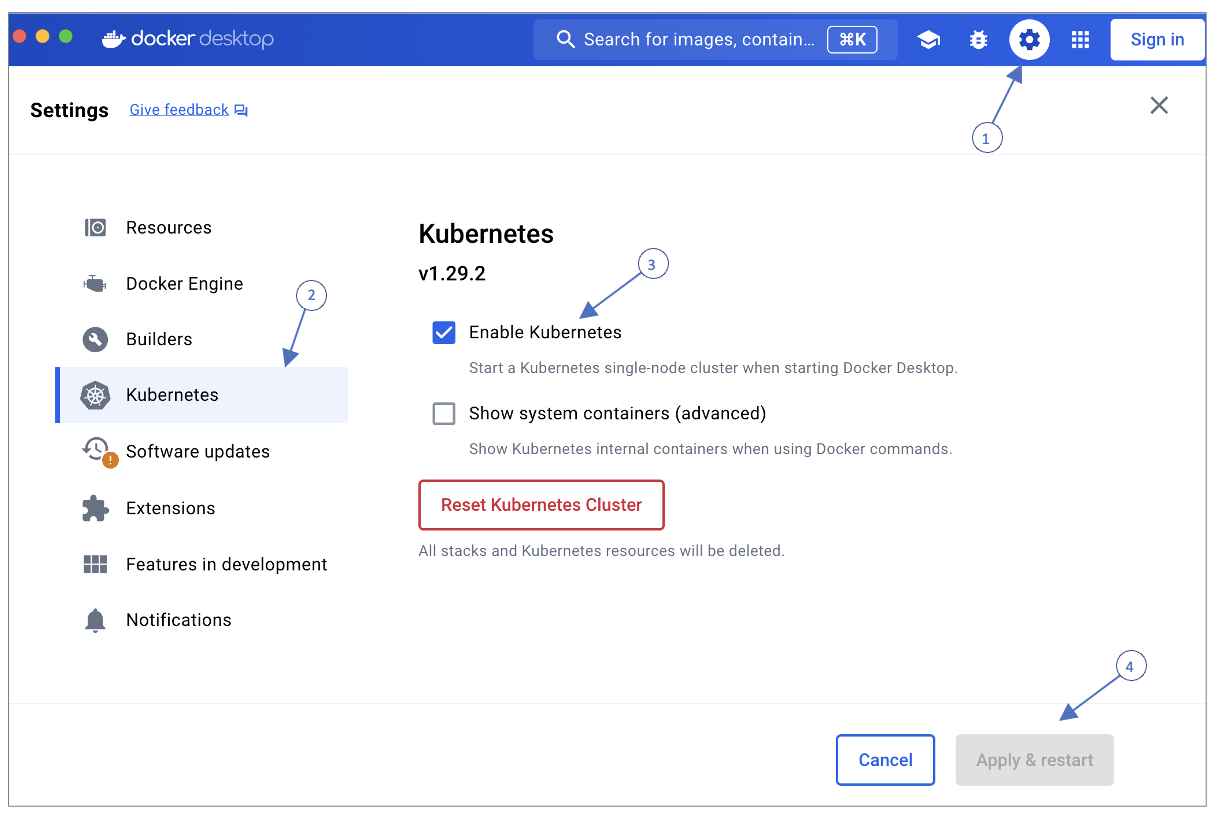
Go into the Docker Desktop client and click on the cogwheel 1 in the upper right. This brings up the settings dialog. Select Kubernetes 2 on the left and then Enable Kubernetes 3. Next click Apply and Restart 4.
Step 2 - Deploy Leap on Kubernetes
Leap on Kubernetes Process Overview
In this tutorial we will install Leap with the default built in Derby database. In a real environment Leap would be installed with PostgreSQL, Oracle or DB2.
Leap is installed on Kubernetes with a Helm command. The Helm command will reference the Leap Helm Chart and a custom deploy-values YAML file which we will create.
The Helm Chart is a package file that includes information on how to deploy Leap. An example of a Helm Chart is hcl-leap-deployment-v1.1.0_20250523-2042_Leap_v9.3.10_pjs_release_leap-9.3.10_dleap-1.1.8.tgz. Don’t edit the file, but feel free to unzip it and explore the default settings in values.yaml.
The deploy-values YAML file lives outside of the Helm chart and overrides the default values set in the values.yamlfile which lives inside the Helm chart. It is used to specify things that are unique to your deployment and the repository you will be pulling the Leap image from. In this case we will prepare the deploy-values YAML file with specific information pertaining to how we want to deploy Leap on Docker Desktop.
Persistent Volumes (PVs) are how Leap stores and persists information. This is where the Derby database will live. Essentially a PV is a block of storage. In our case it will be a folder on your hard drive. PVs are created with a YAML file. In this tutorial we will create a second YAML file for purposed of creating a PV.
Create a PV
Create a directory on your hard drive for the PV
The first step is to create a directory on your hard drive for the PV. In my case I did everything in my downloads directory on my Mac and created a directory named pvs. So, the path to my PV directory is /Users/martinlechleider/downloads/pvs. The path to your directory will of course be different.
Create the YAML file for PV creation
In a code editor create the following file and name it pv-hostpath.yaml. Make sure the path to your PV directory is correct on line 15.
 1. apiVersion: v1
 2. kind: PersistentVolume
 3. apiVersion: v1
 4. metadata:
 5.   name: leap-pv
 6.   labels:
 7.     type: local
 8. spec:
 9.   storageClassName: hostpath
10.   capacity:
11.     storage: 2Gi
12.   accessModes:
13.     - ReadWriteOnce
14.   hostPath:
15.     path: "/Users/martinlechleider/downloads/pvs"
Create the PV
Use the command below to create the PV in your terminal. Make sure you are in the directory where you created pv-hostpath.yaml.
kubectl create -f pv-hostpath.yaml
You should get confirmation that the PV was created.
persistentvolume/leap-pv created
HCL Harbor Repository
Starting with Leap 9.3.8, the Leap image and Helm chart are made available through the HCL Harbor Repository. Those with entitlements should be able to login to the repository and navigate to the Leap project.
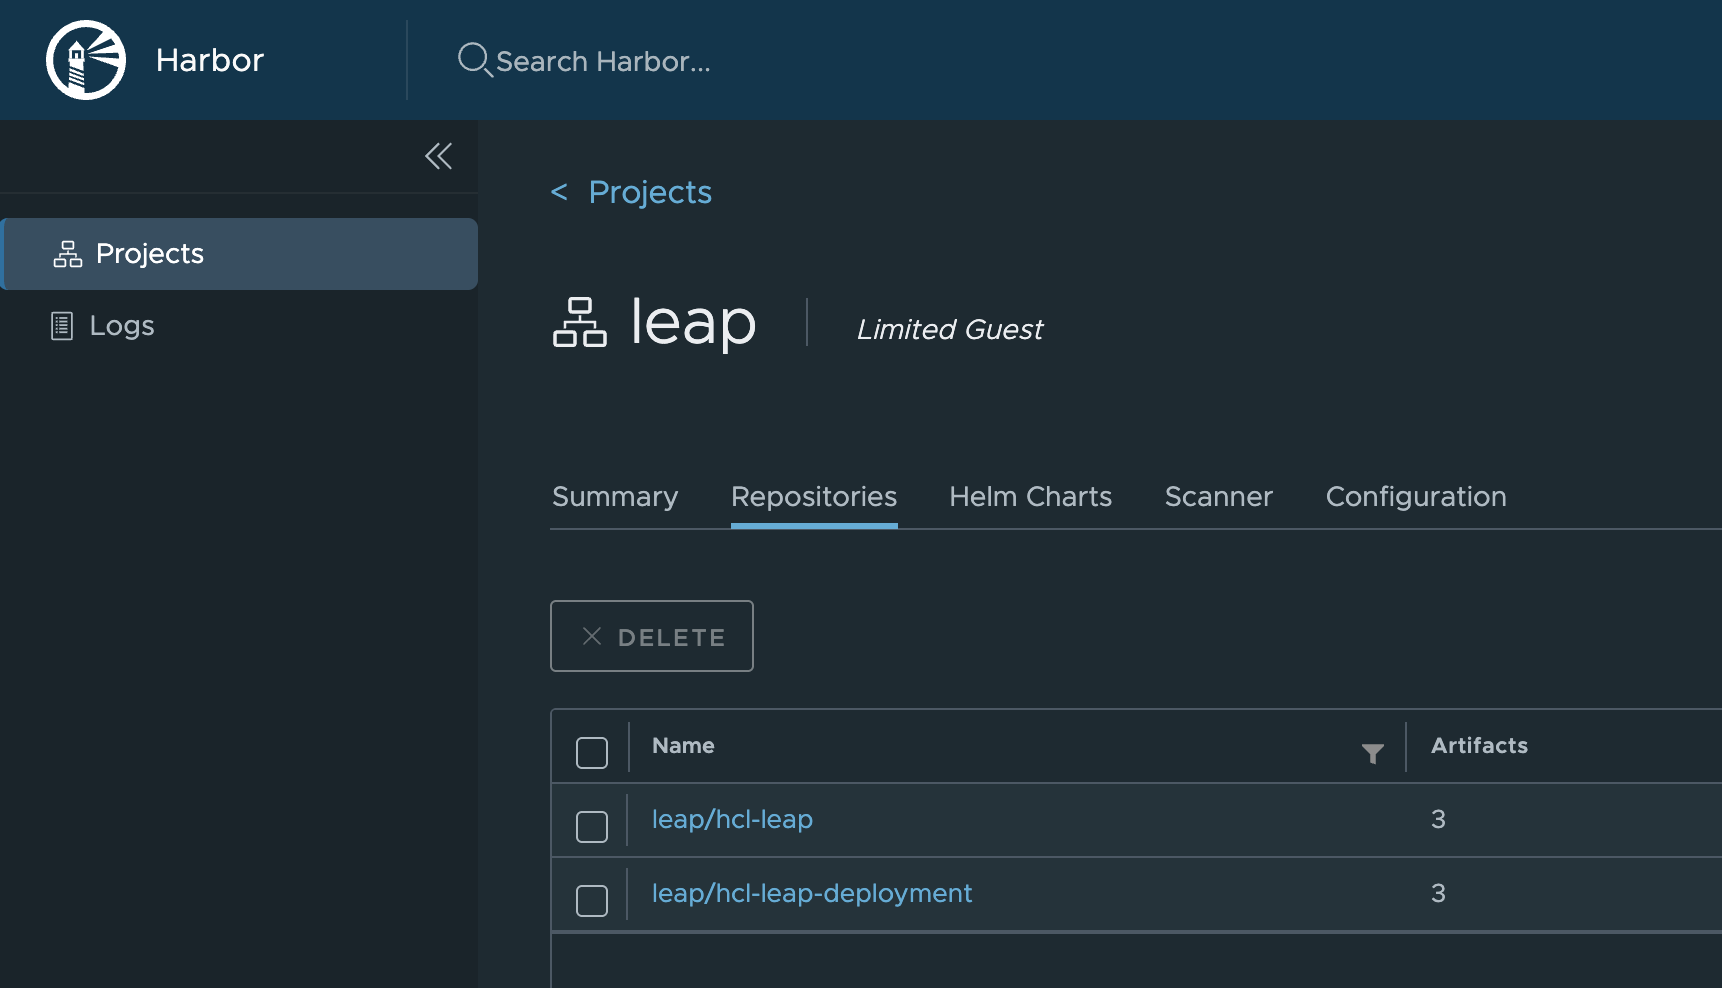
The Leap Helm chart is located under leap/hcl-leap-deployment folder and the Leap image under leap/hcl-leap. You will see the last 3 versions of Leap in each.
CLI Login to Harbor
The first step is to authenticate with Harbor at your Docker command line interface. To do this you need your Harbor CLI secret. You can obtain it by navigating to your User Profile in HCL Harbor. You can copy it from the field called CLI secret.
To authenticate issue the following command
helm registry login -u <YOUR_HARBOR_USERNAME> https://hclcr.io/
This will comeback asking for a password. Paste in the CLI secret and press enter. Note: The Leap documentation says to include the CLI secret in the login command. I found for security reasons this does not work on my Mac (command history could expose the secret), so I use this approach instead.
Pull the Helm chart
Once authenticated you can pull the Helm chart down to your laptop. Copy the pull command from the Leap release you want under leap-deployment and run it. For example:
helm pull oci://hclcr.io/leap/hcl-leap-deployment --version 9.3.10
This will pull the Helm chart down to the directory you are in. The resulting file in this case is
hcl-leap-deployment-9.3.10.tgz.
Custom deploy-values YAML file
Get Leap image information from Harbor
You can deploy the Leap image directly from Harbor. But to do so you need some information. Go to the release you want in the hcl-leap folder and click on the artifact. Next copy the pull command for the artifact. It will look like this:
docker pull hclcr.io/leap/hcl-leap:9.3.10.25
In this case the repository is hclcr.io, the image name is hcl-leap and the tag is 9.3.10.25. You will need this information when we prepare the custom deploy-values YAML file.
Create a Kubernetes secret with your CLI secret
The custom deploy-values YAML file will pull the image from Harbor, but to do so it needs your Harbor credentials. We will pass them as a Kubernetes secret. To create the secret:
kubectl create secret docker-registry leap-harbor --docker-server="hclcr.io" --docker-username='<YOUR_HARBOR_USERNAME>' --docker-password='<YOUR_HARBOR_CLI_SECRET>'
After executing the command, you should receive the following message:
secret/leap-harbor created
In this next step we will create the YAML file with with your settings. Create the following file (below) and name it deploy-values.yaml. Make sure the image repository on line 5, the image tags on line 8, and the image name on line 11 and matches yours. Note, the name of the Harbor secret on line 4 matches the one created above, the repository on line 5 matches Harbor and the name on line 11 matches Leap on Harbor.
The section for Persistent Volume Claims (PVCs) are claims to a block of storage. In this case the block of storage our Leap deployment will claim is the PV we setup. The storageClassName on line 18 must match the storageClassName of the PV we setup. Also, the storage amount on line 20 must not exceed what we allocated to the PV.
Note that we are specifying port 9080 for the deployment on line 24. We will use this later in a port forwarding command. Also note that we are enabling the Leap Admin Config page on line 32. The Admin Config page can be used for setting up integration with Volt MX Foundry.
1. images:
2.   pullPolicy: "IfNotPresent"
3.   imagePullSecrets:
4.     - name: "leap-harbor"
5.   repository: "hclcr.io"
6.   # Image tag for each application
7.   tags:
8.     leap: "9.3.10.25"
9.   # Image name for each application
10.   names:
11.     leap: "leap/hcl-leap"

12. # Persistent Volume Setup
13. volumes:
14.   # Persistent Volumes for Leap. To disable a volume, set it to null
15.   leap:
16.     # RWO PVC, one per Leap pod - RWO. Used to persist the Derby database for development and test deployments
17.     rwo:
18.       storageClassName: "hostpath"
19.       requests:
20.         storage: "2Gi"
21.       # Optional label selector to further filter the set of volumes. Only the volumes whose labels match the selector can be bound to the claim.
22.       selector:
23.       # Optional volume name to specifically map to
24.     #  volumeName: "leap-pv"
25.     rwx: null
26.     log: null

27. configuration:
28.   # Application specific configuration for Leap
29.   leap:
30.     leapProperties: |
31.       ibm.nitro.InfoEntryPoint.dailyInfo = <div>Welcome to <b>HCL Leap 9.3.9</b> in Kubernettes on Docker Desktop!</div>
32.       ibm.nitro.NitroConfig.serverURI = http://localhost:9080/apps
33.       ibm.nitro.SetupAll.setupStatus = start
34.       ibm.nitro.NitroConfig.enableAdminConfigUI=true
35.     configOverrideFiles:
36.       trustCerts: |
37.         <server description="leapServer">
38.           <ssl id="defaultSSLConfig" trustDefaultCerts="true" />
39.         </server>
40.       derbyOverride: |
41.         <server>
42.           <dataSource id="leapDerbyDatasource" isolationLevel="TRANSACTION_READ_COMMITTED" />
43.         </server>
Run Helm Install
The next part is where we bring the pieces together and perform the install. To do this run the following command.
helm install your-release-name path-to/helm-chart -f path-to/deploy-values-yaml
So, in our case an example would be the following. This assumes we are in the same directory as the Helm chart and YAML file.
helm install hcl-leap-9310 hcl-leap-deployment-9.3.10.tgz -f deploy-values.yaml
If successful, the Helm install command, will return something like the following. This means the deployment is scheduled in Kubernetes.
NAME: hcl-leap-9310
LAST DEPLOYED: Thu Jul 17 10:00:56 2025
NAMESPACE: default
STATUS: deployed
REVISION: 1
TEST SUITE: None
NOTES:
Installation of HCL Leap 9.3.10 done.
In Kubernetes, software is deployed to a pod. It will take a minute or two for the pod to be ready. We can check the status of the pod with the following command.
kubectl get pods
The deployment will be complete when you see the following
NAME                   READY   STATUS    RESTARTS   AGE
hcl-leap-9310-leap-0   1/1     Running   0          3m47s
Port Forwarding
Once we see confirmation that the Leap pod is ready, we can run the command to forward port 9080. Run this command in a new terminal window and keep this window open. Note that the pod name needs to match your Leap pod name.
kubectl port-forward hcl-leap-9310-leap-0 9080:9080
This port forwarding command will make the Leap available at
localhost:9080/apps/secure/org/ide/manager.html
The Leap Admin Config Page will be available at
localhost:9080/apps-admin/secure/org/admin/config/index.html
Summary
You can deploy new releases of Leap using the same process. In Docker Desktop I find it handy to reset the kubernetes cluster when doing so. Any work you’ve done will persist on your hard drive, so resetting the cluster will not harm it.
For deploying a new image:
- Download and load the image as before if not pulling it from Harbor.
- Update the tag name in
deploy-values.yaml. - Run
kubectl create -f pv-hostpath.yamlto recreate the PV. - Run the Helm install command with the new release name. You can use the same Helm Chart as before.
- Once the pod is up and running use the port forwarding command with the new release name.
That’s it. A new release can be up and running in minutes. Good luck, and suggestions on how to improve this tutorial are welcome!