HCL Leap is a powerful low-code platform for building business applications, forms, and workflows. While Leap provides a solid set of built-in widgets, many organizations encounter requirements that go beyond what’s available out-of-the-box. To address these needs, Leap supports custom widgets, allowing developers to extend the platform’s capabilities and there are some examples are available in the HCL Leap – Custom Widgets repository.
When building new custom widgets, an effective development approach is to use React—a modern, component-based JavaScript library.
This article explores the technical approach of developing Leap custom widgets as a React app, the architectural benefits, and the value this brings to enterprise teams.
Why Use React for Leap Custom Widgets?
React is widely adopted for building interactive, maintainable, and reusable UI components. By writing Leap custom widgets in React, developers can:
- Leverage Component Reusability: React’s component model encourages modular design. Widgets can be developed as isolated components that share a common framework.
- Utilize a Rich Ecosystem: React’s ecosystem includes libraries for UI (like Material-UI), state management, accessibility, and testing, accelerating development and ensuring quality.
- Ensure Maintainability: React’s declarative approach and strong community support make it easier to maintain and evolve widgets as requirements change.
- Enable Modern UI/UX: React supports responsive layouts, accessibility, and theming, allowing widgets to match modern design standards and user expectations.
Technical Approach
-
Single React App, Multiple Widgets
Instead of building each widget as a standalone script, all widgets are developed within a single React application. This approach offers several advantages:- Shared Dependencies: All widgets can share React, Material-UI, and other libraries, reducing bundle size and avoiding duplication.
- Consistent Build Process: Using a tool like Vite or Webpack, the app can be built and optimized as a single bundle, simplifying deployment.
- Centralized Codebase: Maintenance, updates, and bug fixes are easier when all widgets live in one repository.
-
Widget Registration with Leap
Each widget is defined as a JavaScript object that describes its properties, rendering logic, and integration points. At runtime, these widgets are registered with Leap’s Nitro runtime using a simple pattern. This ensures that all custom widgets are available for use in Leap forms and applications.
Hosting and Deployment: Why Use a DX Script Application?
Leap requires that custom widgets be hosted somewhere accessible to the user when accessing the Leap application. A great approach is to package the React app as a DX Script Application. This method offers several technical and operational benefits:
- Centralized Hosting: The DX Script Application is managed within the Digital Experience (DX) platform, making it easy to control access, updates, and versioning.
- Automated Deployment: Using tools like dxclient, teams can automate the deployment of the Script Application, making it straightforward to push updates, roll back changes, or deploy to multiple environments.
- Consistent Environment: Hosting within DX ensures that widgets are served from a trusted, consistent environment, reducing issues related to cross-origin requests or asset availability.
Practical Benefits for Developers
- Rapid Prototyping: React’s hot-reloading and component isolation make it easy to develop and test widgets quickly.
- Code Reuse: Common logic and UI patterns can be abstracted into shared components, reducing duplication.
- Testing: React’s ecosystem supports robust unit and integration testing, improving reliability.
Practical Benefits for Organizations
- Consistency: Widgets built in React can be styled and configured to ensure a consistent user experience across all Leap apps.
- Scalability: As business needs grow, new widgets can be added to the same codebase and deployed with minimal friction.
- Future-Proofing: React’s popularity and active development ensure long-term support and compatibility with modern web standards.
- Streamlined Operations: Using a DX Script Application and automated deployment tools like dxclient simplifies the process of updating and managing custom widgets.
Case Study
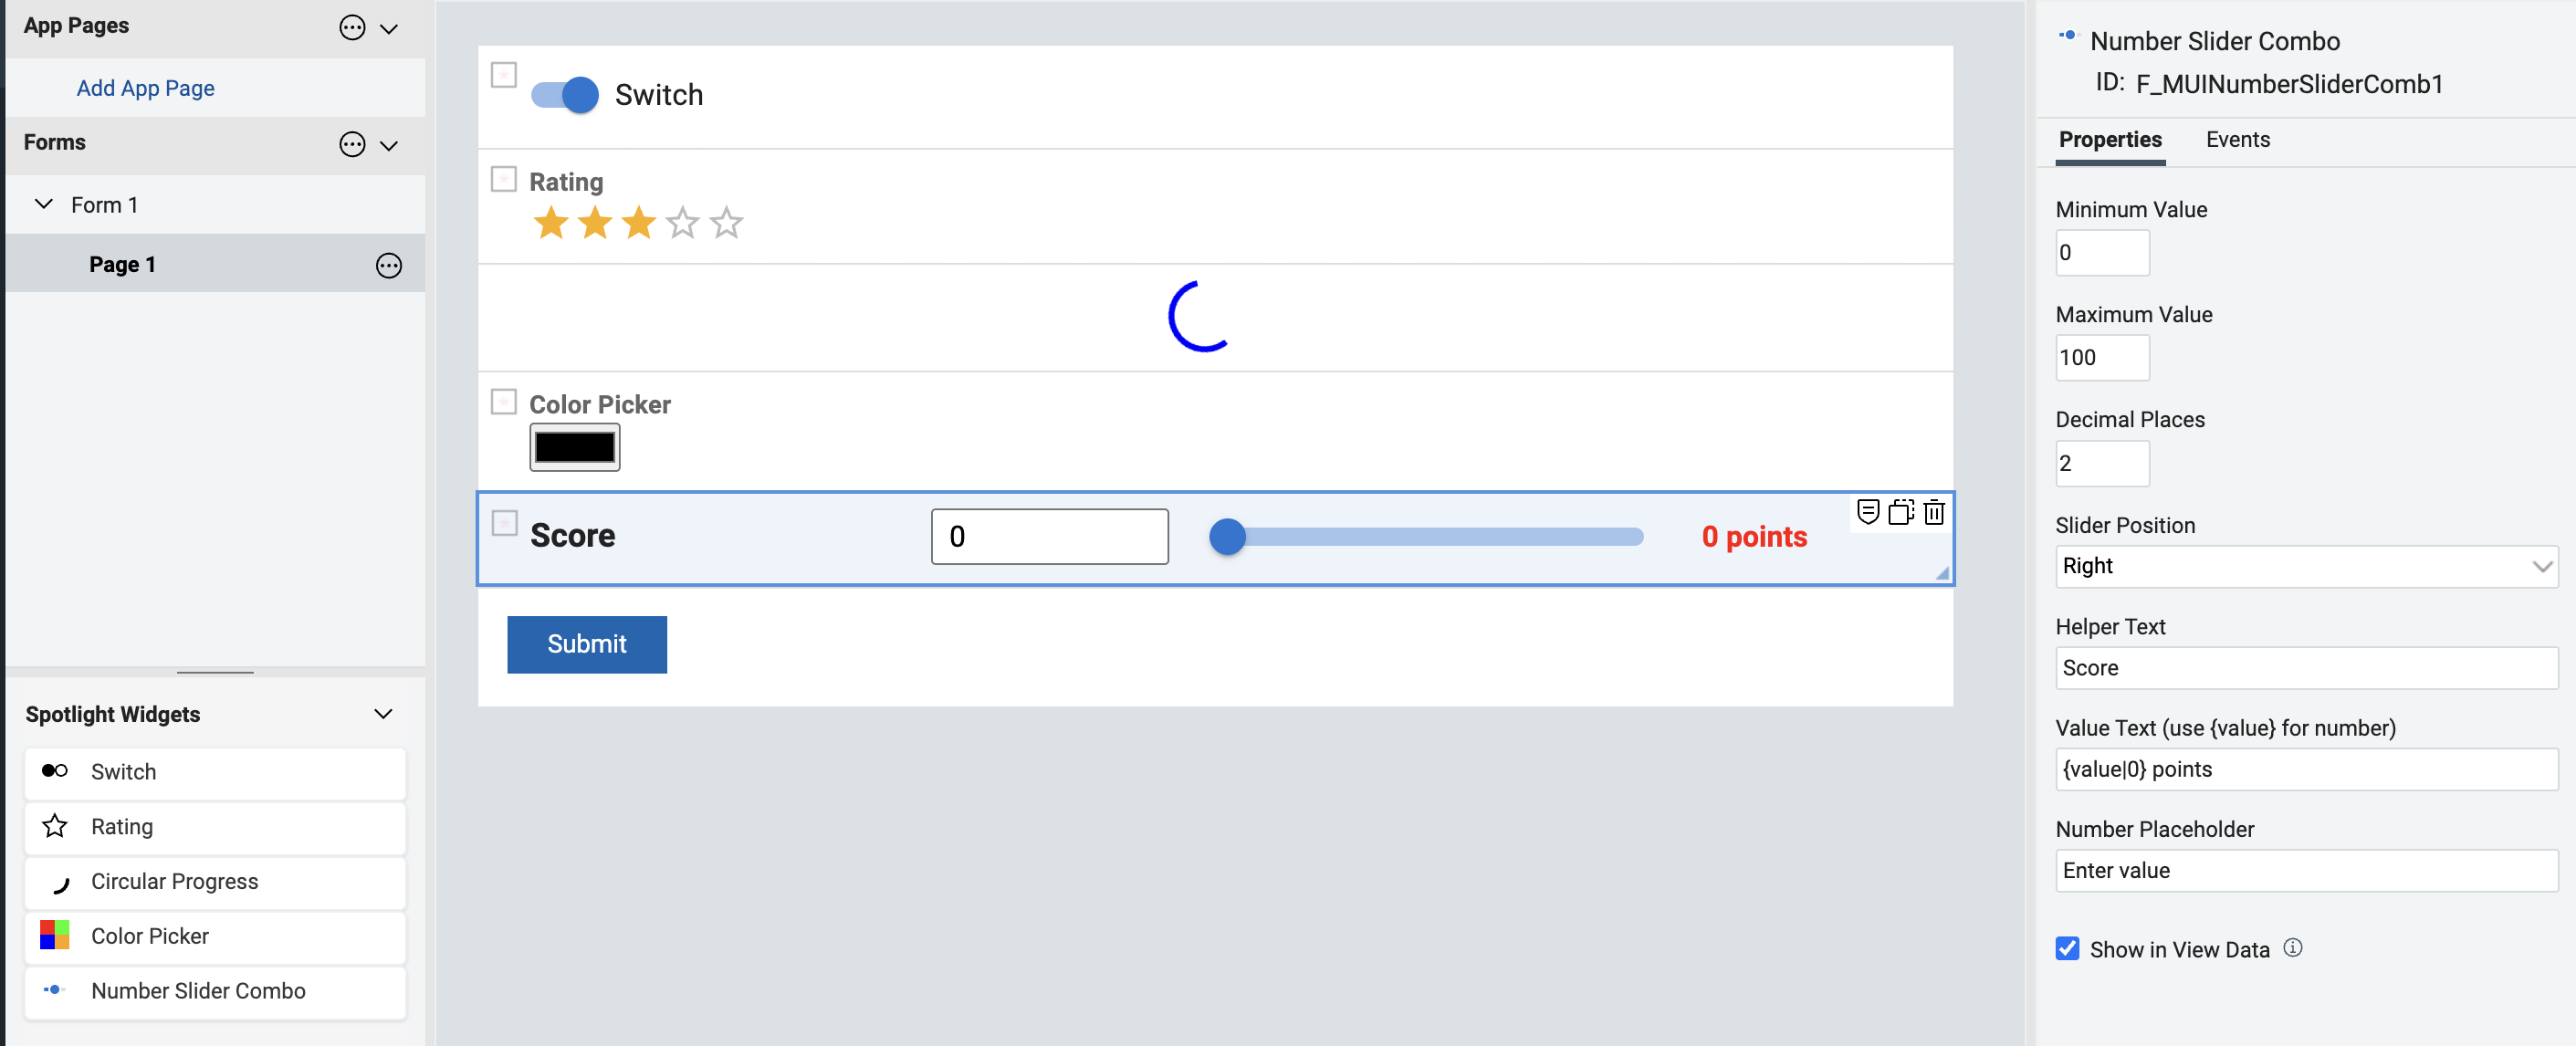
I built a React app that (currently) provides the following Leap custom widgets:
- Switch: Boolean toggle to set true/false.
- Rating: Select number of stars, 1-5.
- Circular Progress: Loading icon (can be used in conjunction with rules to show progress).
- Color Picker: Select a color using HTML5 and save the value.
- Number Slider Combo: Combines a slider and a number input, allowing users to select or type a value with optional decimal places, helper text, and value display.
This React app was built using Vite and the main.jsx simply renders App.jsx which in turn references the Leap Custom Widgets in 2 ways - one when running on Leap (if ‘nitro’ is defined) and one when running locally:
Registering the widget with Leap, e.g.
nitro.registerWidget(muiCircularProgressWidgetDef);
Configuring the widget to use the test harness. This is a custom component that allows the UI to be rendered, and properties set, when running locally (i.e. npm run dev), e.g.
<WidgetTestHarness
  widgetDef={muiCircularProgressWidgetDef}
  initialProps={{
    size: '40px',
    color: 'blue',
    title: 'Progress'
  }}
  title="Circular Progress Widget"
/>
App.jsx determines which of these to use by checking if ‘nitro’ (provided by the Leap server) is defined:
if (typeof nitro === 'undefined') { ...
Each widget is separate component that defines the required properties per Custom Widget API v1.0.0 - HCL Leap 9.3.12 Help Center, e.g.
const muiCircularProgressWidgetDef = {
  id: `${BASE_COMPONENT_ID}.MuiCircularProgress`,
  version: '0.1.0',
  apiVersion: '1.0.0',
  label: {
    'default': 'Circular Progress'
  },
  description: {
    'default': 'Circular Progress Spinner',
  },
  category: CATEGORY,
  iconClassName: styles.widgetIcon,
  properties: [
    {
      id: 'size',
      propType: 'string',
      label: 'Size',
      defaultValue: '40px'
    },
    {
      id: 'color',
      propType: 'string',
      label: 'Color',
      defaultValue: ''
    }
  ],
… together with the necessary UI, e.g.
const getInitialState = (initialProps) => ({
  label: initialProps.label,
  size: initialProps.size || '40px',
  color: initialProps.color || 'blue'
});

const renderContent = ({ state }) => (
  <Box sx={{ display: 'flex', justifyContent: 'center', alignItems: 'center', height: '100%' }}>
    <CircularProgress size={state.size} style={{ color: state.color }} />
  </Box>
);
The Leap widget functions are provided throuh a helper script which uses these definitions. This helper script is shared by all widgets :
instantiate: createLeapWidget({
  renderContent,
  getInitialState
})
The widget components do not have logic themselves around whether it is running locally (via the test harness) or on the Leap server but the createLeapWidget function needs to cater for the fact that server-side functions are not available, e.g.
setValue: (val) => {
  state.value = val;
  render();
  // Fire onChange event in local mode (when Nitro is not present)
  if (typeof nitro === 'undefined') {
    eventManager.sendEvent({ type: 'onChange' });
  }
},
:
Once built, the React script app is deployed to DX. This requires configuration in package.json, e.g.
"scripts": {
  :
  "dx-deploy-app": "dxclient deploy-scriptapplication push -dxUsername $dxUsername -dxPassword $dxPassword -wcmContentName \"$npm_package_config_dxclient_wcmContentName\" -wcmSiteArea \"$npm_package_config_dxclient_wcmSiteArea\" -mainHtmlFile $npm_package_config_dxclient_mainHtmlFile -contentRoot \"$npm_package_config_dxclient_contentRoot\" -dxProtocol $npm_package_config_dxclient_protocol -hostname $npm_package_config_dxclient_hostname -dxPort $npm_package_config_dxclient_port",
  "dx-deploy-app-win": "dxclient deploy-scriptapplication push -dxUsername %dxUsername% -dxPassword %dxPassword% -wcmContentName \"%npm_package_config_dxclient_wcmContentName%\" -wcmSiteArea \"%npm_package_config_dxclient_wcmSiteArea%\" -mainHtmlFile %npm_package_config_dxclient_mainHtmlFile% -contentRoot \"%npm_package_config_dxclient_contentRoot%\" -dxProtocol %npm_package_config_dxclient_protocol% -hostname %npm_package_config_dxclient_hostname% -dxPort %npm_package_config_dxclient_port%",
  "dx-deploy-app-use-env": "dxclient deploy-scriptapplication push -dxUsername $dxUsername -dxPassword $dxPassword -wcmContentName \"$npm_package_config_dxclient_wcmContentName\" -wcmSiteArea \"$npm_package_config_dxclient_wcmSiteArea\" -mainHtmlFile $npm_package_config_dxclient_mainHtmlFile -contentRoot \"$npm_package_config_dxclient_contentRoot\" -dxProtocol $dxProtocol -hostname $dxHostname -dxPort $dxPort",
  "dx-deploy-app-use-env-win": "dxclient deploy-scriptapplication push -dxUsername %dxUsername% -dxPassword %dxPassword% -wcmContentName \"%npm_package_config_dxclient_wcmContentName%\" -wcmSiteArea \"%npm_package_config_dxclient_wcmSiteArea%\" -mainHtmlFile %npm_package_config_dxclient_mainHtmlFile% -contentRoot \"%npm_package_config_dxclient_contentRoot%\" -dxProtocol %dxProtocol% -hostname %dxHostname% -dxPort %dxPort%"
},
:
"config": {
  "dxclient": {
    "wcmContentName": "Leap Widgets",
    "wcmSiteArea": "Leap/Leap Widgets",
    "mainHtmlFile": "index.html",
    "contentRoot": "./dist",
    "protocol": "https",
    "hostname": "my-dx-server.domain.com",
    "port": "443"
  }
}
… followed by execution of the appropriate command, e.g.
npm run build; dxUsername=USERNAME dxPassword=PASSWORD npm run dx-deploy-app
Once the script app has been deployed to DX, it can be referenced by Leap thereby making the custom widgets available. This is achieved by adding configuration entries to Leap_config.properties, e.g.
ibm.nitro.NitroConfig.runtimeResources.1=<link rel='stylesheet' type='text/css' media='screen' href='/wps/wcm/connect/leap/leap widgets/leap widgets?SRV=cmpnt&cmpntname=assets/index.css&source=content&subtype=css'>
ibm.nitro.NitroConfig.runtimeResources.2=<script type='module' src='/wps/wcm/connect/leap/leap widgets/leap widgets?SRV=cmpnt&cmpntname=assets/main.js&source=content&subtype=javascript'></script>
Note: Leap needs to be fully restarted for this to become active.
The widgets are now available in the Leap UI and can be added to the canvas:
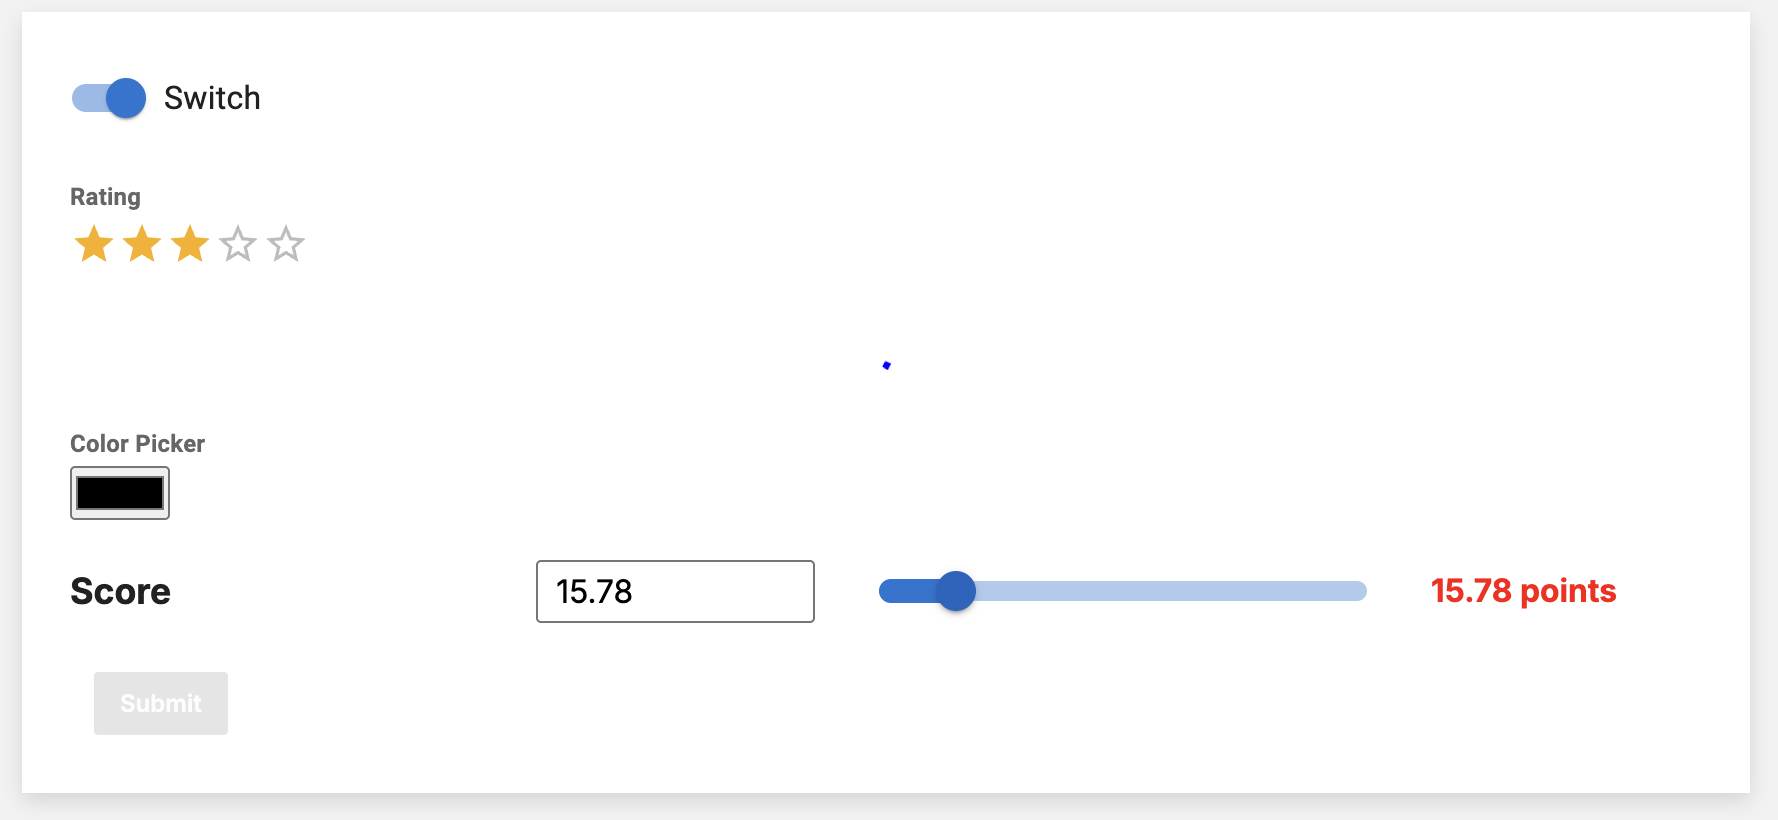
… and previewed:
Additionally, the ‘WidgetTestHarness’, that is shared by all widgets, allows testing of the widget’s UI locally before deployment and new widgets can be added by creating additional components following the same approach and configuring them with a <WidgetTestHarness> and/or calling nitro.registerWidget().
Conclusion
Developing Leap custom widgets as a React app and deploying them as a DX Script Application is a technically robust and operationally efficient approach. It enables teams to deliver modern, reusable, and maintainable UI components that extend Leap’s capabilities and meet evolving business requirements. By centralizing widget development and leveraging automated deployment, organizations benefit from faster development cycles, consistent user experiences, and easier maintenance.
For teams looking to get more from HCL Leap, adopting this approach to custom widget development and deployment is a practical and strategic choice.